
How to Germinate Marigold Seeds: Warmth and Moisture
The conservative method presses seeds into firm contact with the mix and uses a shallow covering rather than leaving them exposed.
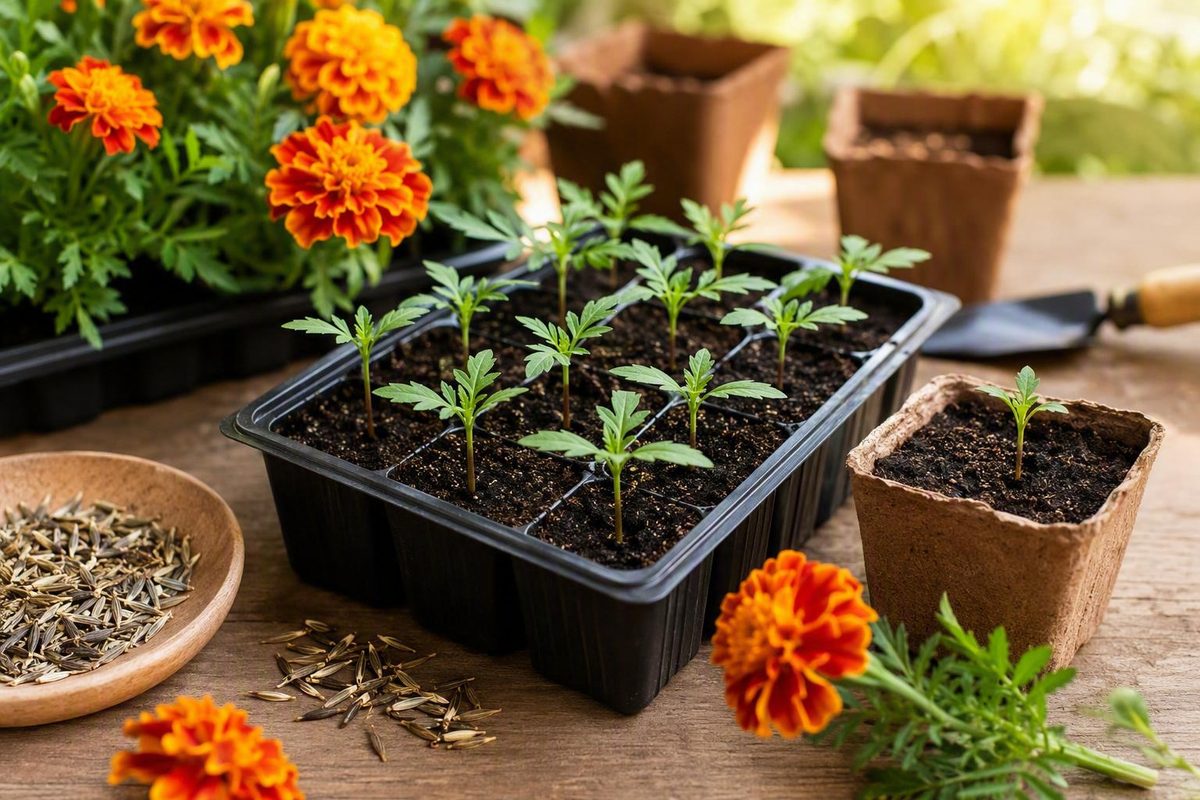
Marigold seeds can be started indoors in trays or sown directly outdoors after frost danger has passed. In either setting, the dependable approach is the same: sow shallowly, maintain warmth and steady moisture, and avoid dense or waterlogged soil. Once shoots appear, strong light becomes the priority.
Timing still matters. Starting too early can leave you with crowded seedlings that cannot safely go outside, while sowing in cold garden soil can delay emergence. When general advice conflicts with the directions for a particular cultivar, follow the seed packet.
The quick marigold germination recipe
Fill a draining container with pre-moistened, light seed-starting mix. Sow marigold seeds approximately 1/4 inch deep, water without displacing them, and keep the mix evenly damp rather than saturated. Under favorable conditions, seedlings commonly emerge in approximately 5–10 days, although seed quality, depth, temperature, and moisture can alter the timeline. These depth and emergence figures align with Savvy Gardening’s marigold-sowing guidance.
Keep the growing medium near 70–75°F as a practical indoor target. That sits within the warm 70–80°F range reported by one gardener’s regional marigold-starting method, rather than representing a proven optimum for every cultivar or setup. Watch the published timing and temperature discussion.
As soon as green shoots appear, remove any clear cover and provide strong light. Warmth and steady moisture support germination; light becomes especially important once the shoot rises above the mix. Inadequate post-emergence light can quickly produce pale, leaning, elongated seedlings.
Marigold germination conditions at a glance
Condition Practical target Sowing depth Shallow, beneath a light covering Indoor medium Light, clean, well-draining seed-starting mix Temperature The warm indoor target described above Moisture Evenly damp, never persistently saturated Expected emergence The approximate window given above, not a guarantee After emergence Strong light promptly, plus moderate moisture and airflow
Always check the packet before sowing. If it specifies a different depth, indoor-starting interval, or spacing for that cultivar, use those directions.
Start indoors or sow directly outdoors?
Starting indoors provides greater control over temperature and moisture and can give plants a head start. Direct sowing requires fewer supplies and eliminates transplanting, but seeds must contend with fluctuating temperatures, rain, drying wind, and weeds.
Neither method is universally better. Choose according to your frost calendar, available indoor light, and willingness to manage seedlings.
| Factor | Start indoors | Direct-sow outdoors |
|---|---|---|
| Timing | Several weeks before the expected last frost | After frost danger has passed and soil has warmed |
| Frost risk | Seeds are protected, but seedlings must remain inside while frost threatens | Reduced by delaying sowing |
| Growing medium | Light seed-starting mix in draining containers | Loose, well-draining soil or potting mix |
| Temperature control | Easier to maintain consistent warmth | Soil temperature changes with the weather |
| Lighting | Strong light is essential after emergence | A sunny site supplies outdoor light |
| Moisture control | Easy to inspect, though small cells dry quickly | Rain and wind make moisture less predictable |
| Work involved | Requires trays, monitoring, thinning, hardening, and transplanting | Requires fewer supplies but regular seedbed checks |
| Best fit | A gardener seeking a head start who can provide adequate light | A gardener with warm, frost-free conditions who prefers a simpler process |
Calculate an indoor sowing date
Published recommendations differ because marigolds grow quickly and gardeners work in different climates. One regional method starts them approximately four to five weeks before the expected last frost and warns against beginning too early. That schedule is described in a North Texas gardener’s video.
Other guidance places indoor sowing six to eight weeks before the final frost and recommends waiting an additional one or two weeks after that frost date before direct sowing. Eden Brothers presents those longer, conservative intervals. Taken together, the advice supports treating approximately four to eight weeks as a flexible planning range rather than a universal rule.
To calculate your sowing date:
- Find your area’s expected or average last-frost date.
- Read the indoor-starting interval on the seed packet.
- Count backward by that number of weeks.
- Decide whether your indoor setup can support the plants until outdoor conditions are safe.
- Choose the later end of the workable range if your light or container space is limited.
For example, if your expected last frost is May 10 and the packet says to begin six weeks beforehand, the planning date is approximately March 29. That calculation does not guarantee frost-free weather on May 10. Check the current forecast before hardening off or transplanting.
Starting early helps only if you can provide adequate light and space. Fast-growing marigolds may become crowded or need larger containers long before they can safely enter the garden.
When to direct-sow
Wait until frost danger has passed and the soil has warmed. Limited commercial guidance reports 60°F soil as a workable minimum, but that figure should not be treated as a scientifically established optimum. The same retailer’s marigold guide recommends waiting for that threshold before direct sowing.
If the garden remains cold, saturated, or exposed to another likely frost, wait. A brief delay is generally easier to manage than seed sitting in unfavorable soil.
Prepare the containers, mix, seeds, and water
A basic indoor setup requires only:
- Marigold seeds
- A clean cell tray, flat, or small pots
- Open drainage holes in every container
- Light seed-starting mix
- Labels and a waterproof marker
- A mister, fine-rose watering can, pipette, or another gentle watering tool
- An optional clear humidity cover
- An optional seedling heat mat
Use seed-starting mix rather than soil dug from the garden. Seed-starting mix remains comparatively light and porous in small containers. Dense outdoor soil may compact, drain slowly, and reduce the air available around seeds and young roots.
Seeds require both moisture and air. In a container without drainage, excess water fills the spaces that would otherwise hold air. Drainage is therefore part of moisture management, not an optional convenience. The University of California Master Gardener Program likewise recommends light seed-starting mix and identifies both complete drying and waterlogging as causes of failure in its guide to common seed-starting mistakes.
Pre-moisten the mix
Place dry mix in a separate bowl or tray, add water gradually, and stir until the moisture is evenly distributed. The mix should clump loosely when squeezed without releasing a stream of water.
Pre-moistening helps in two ways:
- It prevents dry pockets from drawing moisture away from newly sown seeds.
- It reduces the overhead watering needed after sowing, making seeds less likely to float or shift.
Fill the containers loosely and tap them gently to settle the mix. Do not press it into a dense block. Leave a little space below the rim so water does not immediately overflow.
Label each container with the cultivar and sowing date. If emergence is delayed, the date lets you distinguish a normal wait from a prolonged failure. Labels also prevent similar-looking seedlings from becoming mixed up.
A heat mat is optional. Monitor conditions around the tray rather than assuming a room or windowsill produces a particular soil temperature.
A clear cover is also optional. It slows moisture loss, but it can conceal excessive wetness. Inspect covered trays daily, vent heavy condensation, and remove the cover when seedlings begin to emerge.
How to sow marigold seeds indoors, step by step
1. Fill the containers
Add pre-moistened seed-starting mix to clean containers with unobstructed drainage holes. Settle the mix gently without compacting it. Level the surface so water and seeds do not collect in low spots.
2. Place the seeds
Sow one or two seeds in each cell, depending on seed supply and whether you are willing to thin extras. In an open tray, space seeds approximately one inch apart so the resulting seedlings are easier to inspect, lift, and separate. This is a commonly published tray-spacing recommendation rather than a requirement for germination.
Marigold seeds are elongated and may resemble small dark needles with pale ends.
3. Cover shallowly
Press each seed into contact with the moist mix, then add no more than approximately 1/4 inch of fine mix or vermiculite. Do not place the seed at the bottom of a deep hole.
Advice about light during germination is inconsistent. One commercial guide claims marigold seeds require light and recommends surface sowing, but the same guide also permits an indoor covering of up to 1/4 inch. Because those directions conflict, the conservative approach is to provide firm contact and a shallow covering rather than insisting that the seeds remain exposed. The conflicting directions appear in the Eden Brothers planting guide.
4. Water without moving the seeds
Mist the surface or apply water slowly with a gentle tool. If the planting tray sits inside a solid bottom tray, you can add a modest amount of water below, allow the mix to absorb it, and then drain the remainder.
Avoid a forceful stream that uncovers seeds or washes them into corners. If a seed becomes fully exposed, sprinkle a little mix over it. If water stands on the surface, let it drain before adding any more.
5. Maintain warmth and moisture
Keep the medium within the warm target range given in the quick recipe. Check it daily, especially when using small cells, grow lights, or bottom heat.
Water according to the condition of the mix rather than a rigid schedule. A tray under warm lights may dry sooner than one in a cool, humid room. The surface can begin to lighten between waterings, but the seed zone should not dry completely during germination.
Do not add water simply because you are checking the tray. If the mix remains dark, damp, and heavy, wait.
6. Know what to expect during days 1–10
Avoid digging for progress because that can disturb an emerging root.
As shoots appear, move the tray into strong light if it is not there already. Remove the humidity cover, allow modest air circulation, and continue monitoring moisture.
Emergence may be uneven. One seed appearing before its neighbors does not necessarily indicate a problem. Continue normal care through the expected germination window.
If nothing has emerged after roughly two weeks, stop adding water indefinitely and begin diagnosing the setup. A community discussion reports that marigolds would ordinarily be expected to emerge within that period, although the observation is anecdotal rather than controlled evidence. See the Garden.org discussion.
How to direct-sow marigolds outdoors
Direct sowing eliminates indoor trays, lights, hardening, and transplanting. The trade-off is reduced control: garden soil may be warm in the afternoon and cold overnight, while the surface alternates between heavy rain and rapid drying.
Wait until frost danger has passed. If spring weather remains unstable, use the conservative post-frost buffer described earlier rather than sowing immediately after the calendar date.
Prepare the site
Choose a full-sun location with soil that drains after rain. Loosen the upper layer and break apart large clods. Deep cultivation is unnecessary for germination, but the surface should be fine enough for shallow sowing and reasonably uniform moisture.
For outdoor containers, use a suitable potting medium and require unobstructed drainage. Container size becomes more important as the plants mature; during germination, depth, warmth, moisture, and aeration are the immediate concerns.
Sow and mark the area
Make a shallow furrow or individual depressions. Sow approximately 1/4 inch deep unless the packet directs otherwise, cover lightly, and press the surface gently to improve seed-to-soil contact.
Mark the row, patch, or pot with the cultivar and date. A visible marker prevents accidental weeding, cultivation, or a second sowing in the same place.
Water with a soft spray. Keep the upper soil layer steadily moist during germination without turning it muddy. Shallow seeds sit close to the drying surface, so inspect the area during warm or windy weather instead of assuming that yesterday’s rain was sufficient.
A delayed seedling is not automatically a failed seed.
Do not worry about final plant spacing at sowing unless the packet specifically directs it. It is often easier to sow somewhat closer, observe emergence, and thin after true leaves develop. Compact and large marigold types do not occupy the same amount of space, so the cultivar’s mature spacing should govern.
Care for seedlings immediately after they sprout
Emergence changes the order of priorities. Before sprouting, the main goals are warm, aerated, evenly moist conditions. After sprouting, strong light, reasonable airflow, and controlled watering become central.
Remove the cover
Take off any clear dome or plastic covering when shoots begin to appear. Its moisture-retention job is complete, and leaving seedlings enclosed can keep the surface persistently wet.
Continue checking the uncovered tray and water as needed. A few unsprouted cells do not require sealing all emerged seedlings beneath a humidity cover.
Provide strong light immediately
Move seedlings under a grow light or into the strongest suitable natural light available. A bright window may work when it supplies enough intensity and duration, but judge the result by the plants rather than by how bright the window appears.
Signs of inadequate light include:
- Unusually long stems
- Strong leaning toward a window or lamp
- Pale growth
- Thin stems that cannot support the leaves
- Rapid stretching before substantial foliage develops
Fourteen to sixteen hours per day under grow lights is one commonly reported option, not an absolute rule for every lamp, room, or season. The appropriate lamp distance depends on its intensity and heat output, so follow the fixture manufacturer’s directions and adjust if seedlings stretch or leaves show stress. This schedule is included in a commercial marigold seed-starting guide.
Continue careful watering
Keep the mix moderately moist while allowing normal drainage and evaporation. Seedlings do not benefit from sitting continuously in water.
When practical, direct water toward the mix rather than repeatedly soaking the foliage. Apply it slowly enough to dampen the root zone without creating puddles.
Provide gentle air movement around the seedlings, not a harsh blast directly at them. Circulation helps the surface dry normally and avoids the stagnant, persistently wet conditions associated with seedling disease.
If bottom heat was used only for germination, continued extra warmth is not automatically necessary. Reduce or remove it if it is making the cells dry too rapidly or contributing to stretched growth.
Recognize seed leaves and true leaves
The first leaf-like structures are seed leaves, or cotyledons.
The leaves that appear afterward are true leaves. True leaves are a more useful developmental milestone than the number of days since sowing.
Thin crowded cells once you can identify healthy seedlings. Moving plants to larger containers after a second set of true leaves develops is one commonly reported approach, as is thinning outdoor seedlings after two true-leaf sets in this marigold growing guide. Handle a seedling by a leaf when possible rather than squeezing its delicate stem, and preserve the root ball.
Troubleshoot seeds that do not sprout or seedlings that fail
Start with the symptom you can observe. “The tray failed” is too broad to diagnose, while “nothing emerged,” “only the edges sprouted,” or “stems collapsed at soil level” points toward different causes.
| Symptom | Factors to investigate | Practical response |
|---|---|---|
| No emergence after the normal window | Old or poor-quality seed, deep sowing, cold mix, complete drying, or prolonged saturation | Review the label, depth, temperature, and moisture history; resow under corrected conditions if necessary |
| Patchy emergence | Uneven watering, inconsistent depth, dry tray edges, variable warmth, or mixed seed quality | Inspect different parts of the tray separately and correct uneven care |
| Mold on the surface | Excess moisture, limited airflow, debris, or a repeatedly wet surface | Remove the cover, improve airflow, reduce unnecessary watering, and discard severely affected material |
| Seedlings collapsing at soil level | Possible damping off, persistent saturation, fungal activity, or other root or stem injury | Remove collapsed material and correct moisture, drainage, and airflow |
| Long, weak seedlings | Insufficient or inconsistent light; unnecessary warmth may contribute | Provide stronger, more even light and reassess bottom heat |
If nothing has emerged
First confirm the sowing date. Then review the setup in this order:
- Seed quality: Was the packet old, damaged, or stored in hot or damp conditions?
- Depth: Were the seeds buried substantially deeper than recommended?
- Temperature: Did the mix remain warm, or was it placed against cold glass or in an unheated area?
- Drying: Did the seed zone become completely dry?
- Saturation: Did the container remain heavy and waterlogged?
- Drainage: Could excess water leave the container?
Correct the next sowing by applying a measured, shallow covering rather than digging through a tray and potentially damaging seeds that have begun to grow.
Cold conditions can delay germination. Move a cool tray to a warmer, stable location or use a regulated heat mat if necessary. A heat mat is an option, not a requirement.
If the surface is moldy or seedlings collapse
Waterlogged mix leaves less air around seeds and roots and can encourage fungal problems. Complete drying is not the solution because that can interrupt germination and damage small roots. Aim instead for a damp, aerated medium that drains after watering.
Damping off is one possible explanation when a young seedling narrows, discolors, and falls at the soil line, but not every weak or wilted seedling has damping off. The UC Master Gardener Program associates stem-base collapse with fungi favored by overly wet conditions and emphasizes drainage, moisture control, and airflow in its seedling troubleshooting guidance.
Remove collapsed seedlings and nearby decaying material. Do not respond by flooding the remaining cells. If losses continue across the tray, restarting with fresh mix and clean containers may be more practical than trying to preserve every plant.
If seedlings are long and weak
Leggy growth usually points to inadequate post-emergence light. Improve the lamp position or natural-light exposure, maintain a more consistent daily light period, and rotate naturally lit trays if illumination comes strongly from one side.
Do not assume fertilizer can replace light. Nor should severely weak stems be buried indiscriminately. Correct the likely cause first and evaluate new growth.
An optional seed-viability check
For questionable seed, some gardeners place a small sample in a moist paper towel inside a bag and watch for root emergence. This is an anecdotal diagnostic method, not the preferred or scientifically validated way to raise marigolds. The technique appears in a Garden.org community discussion.
If you try it, test only a small sample, keep the towel damp rather than flooded, and label the date. Do not draw broad conclusions from one or two seeds. A failed test may indicate poor viability, but inconsistent temperature or moisture can also affect the result.
Reset the tray
When the goal is simply to obtain a healthy batch of seedlings, correct every obvious fault:
- Wash and rinse the containers.
- Confirm that the drainage holes are open.
- Use fresh, light seed-starting mix.
- Pre-moisten the mix evenly.
- Sow shallowly.
- Label the cultivar and date.
- Maintain controlled warmth.
- Water gently according to the condition of the mix.
- Remove any clear cover and provide strong light after emergence.
If the goal is to identify the precise cause of the first failure, run small test batches and change one factor at a time. That diagnostic approach is slower, but it makes the result easier to interpret.
From true leaves to the garden
Use plant development and outdoor conditions—not a calendar date alone—to decide when seedlings are ready for their next stage.
Once true leaves have developed, thin crowded cells by retaining the strongest, best-positioned seedling. Snipping an unwanted seedling at the surface can avoid pulling against neighboring roots. If several seedlings must be preserved, separate them while they are small and move them into individual containers with minimal root handling.
Pot up when roots occupy the current cell, watering becomes difficult to manage, or continued true-leaf growth shows that the seedling needs more room.
Harden seedlings gradually
Indoor-grown seedlings need a transition before permanent outdoor planting. A seven-to-ten-day hardening period is a commonly reported method, although weather or plant stress may require a slower transition.
A practical sequence is:
- Begin with a short period in a sheltered, brightly shaded location.
- Increase outdoor time gradually.
- Introduce gentle morning sun before harsher midday exposure.
- Allow progressively more wind while monitoring moisture.
- Return plants to protection if frost, severe wind, or abrupt cold threatens.
- Extend exposure only when the seedlings tolerate the preceding step.
Hardening does not make marigolds frost-proof. Transplant only after frost danger has passed and outdoor conditions are suitable for a warm-season annual.
Transplant and space by cultivar
Plant hardened marigolds in full sun and well-draining soil.
Follow the packet for final spacing. As bounded examples, many compact types are commonly spaced approximately 6–12 inches apart, while larger African marigolds may need approximately 12–18 inches. Flowering is often reported approximately six to eight weeks after sowing under favorable conditions, but both spacing and bloom time vary by cultivar and growing conditions. These estimates appear in a commercial guide comparing marigold types.
For broader help with frost-date planning, seedling lights, heat mats, damping-off risk, and hardening, see Garden Seed Source’s guide to starting seeds indoors.
Frequently asked questions
How long do marigold seeds take to germinate?
Warm, shallowly sown marigold seeds often sprout in approximately five to seven days, while a broader practical expectation is about five to ten days. Conditions and seed quality can move individual seedlings outside that range. The shorter interval is reported under warm, steadily moist conditions in this marigold growing guide.
If the expected window passes without emergence, check the sowing date, seed quality, depth, warmth, drainage, and moisture history before resowing.
How deep should marigold seeds be planted?
Sow marigold seeds shallowly, generally approximately 1/4 inch deep or beneath a light covering of fine mix or vermiculite. Press each seed into contact with the damp medium before covering it. Savvy Gardening recommends the same approximate depth.
Outdoors, water gently so rain or irrigation does not expose or relocate the seeds. Follow the packet if a particular cultivar provides different instructions.
Do marigold seeds need light to germinate?
The available guidance does not reliably establish an essential light requirement. One retailer recommends surface sowing because it says the seeds need light, yet the same guide permits a shallow indoor covering. Other marigold instructions recommend planting beneath approximately 1/4 inch of mix.
A sensible method is therefore to sow shallowly with good seed-to-medium contact and a light covering. The need for strong light is much clearer after seedlings emerge.
What temperature is best for germinating marigold seeds?
A medium temperature near 70–75°F is a practical indoor target, but it should not be interpreted as an exact optimum for every marigold cultivar. Some published methods use a somewhat wider warm range.
If the mix already stays warm, a heat mat is unnecessary. If it remains cool, regulated bottom heat can help. Monitor the medium and moisture closely because heated cells may dry faster.
When should I start marigold seeds indoors before the last frost?
Published schedules span approximately four to eight weeks before the expected last frost. Use the seed packet’s interval and count backward from your local frost date rather than choosing one universal date.
Favor the later end of the workable schedule if indoor light or space is limited. Marigolds grow quickly, and starting too soon can produce crowded plants that are ready before outdoor conditions are safe.
Keep the process anchored to a few milestones:
- Sow shallowly using the packet and the depth guidance above.
- Maintain warmth and even moisture without saturating the mix.
- Expect emergence within the cited germination window, allowing for normal variation.
- Provide strong light immediately after sprouting.
- Troubleshoot rather than watering indefinitely when emergence is substantially delayed.
- Wait for true leaves before thinning or potting up.
- Harden seedlings gradually before permanent outdoor planting.
- Plant only after frost danger has passed, using the cultivar packet for final timing and spacing.