
How to Sow Marigold Seeds Indoors or Outdoors
Because published directions range from surface sowing to full 1/4-inch coverage, use the packet to resolve cultivar-specific differences.
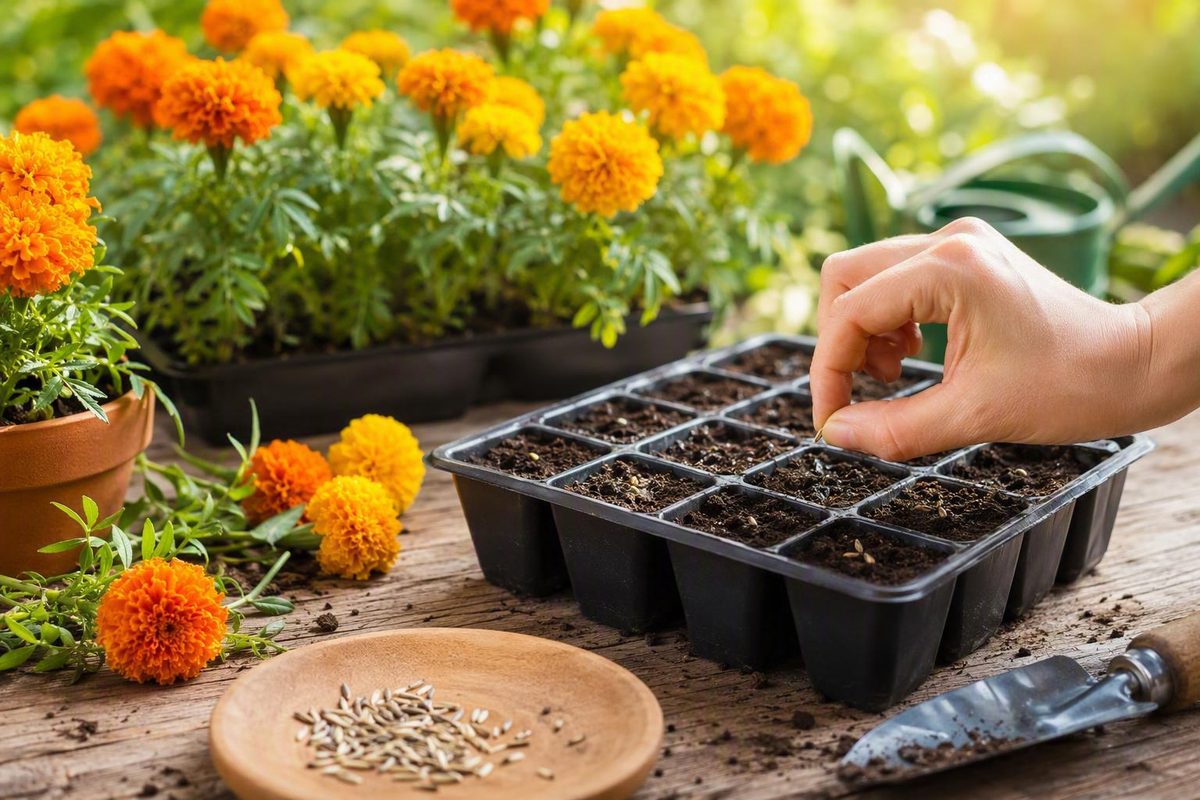
The quick answer: choose indoor starting or direct sowing
Marigolds can be started in trays indoors or sown directly where they will flower.
- Start indoors about six to eight weeks before the expected last frost if you want earlier flowers. This is particularly useful where spring stays cool or the frost-free season is short. The Maker Makes reports a six-to-eight-week indoor window and a five-to-14-day germination range under warm conditions.
- Direct-sow outdoors after frost danger has passed and the soil has warmed. This is the simpler method when spring warms early and the growing season is long enough for the plants to mature.
Both methods follow the same basic principles: use a loose, well-draining growing medium, sow shallowly, water without displacing the seeds, and keep the medium evenly damp rather than saturated. After seedlings emerge, give them strong light. Established outdoor plants flower best in full sun.
Marigold sowing at a glance
- Indoor timing: About six to eight weeks before the expected last frost
- Outdoor timing: After frost danger has passed and soil is approximately 60–65°F (16–18°C) or warmer
- Sowing depth: A light covering, no deeper than approximately 1/4 inch
- Germination: Commonly five to 10 days in warm conditions; allow as long as 14 days
- After emergence: Strong light, moderate moisture, and better airflow
- Before transplanting: Gradual hardening off followed by frost-free, reliably warm weather
University of Minnesota Extension recommends sowing indoor marigold seeds approximately 1/4 inch deep at 70–75°F, where germination is expected in five to eight days. It advises waiting until outdoor soil reaches 65°F before direct sowing. These figures come from the University of Minnesota Extension marigold guide. The broader five-to-14-day range in the box accounts for other supported protocols and less uniform growing conditions.
Indoor starting requires containers, light, and several weeks of seedling care, but it brings flowering forward. Direct sowing avoids the indoor setup, although plants begin flowering later. That delay matters most where autumn frost can end the display early.
Always check the seed packet before planting. Marigolds include compact edging cultivars and substantially larger plants, so packet directions may change the timing, depth, and final spacing.
It does not sell seeds or accept payment from catalogs for placement, as stated on its About page.
When to sow marigold seeds
Choose the sowing date from local conditions rather than from a fixed month.
For indoor sowing, find your area’s expected last-frost date and count backward approximately six to eight weeks. Recommendations do vary: some instructions suggest four to six weeks, while another protocol starts as early as 10 weeks before outdoor planting. The six-to-eight-week range is a useful general starting point, not an inflexible deadline. Savvy Gardening documents the shorter four-to-six-week recommendation and advises following variety-specific packet directions.
In a region with a long, chilly spring, work backward from the date when warm-season flowers can realistically be planted outside, not merely from an average frost date.
For direct sowing, wait until:
- Frost danger has passed.
- The soil surface is workable rather than cold and waterlogged.
- Soil temperature is approximately 60–65°F (16–18°C) or warmer.
- The immediate forecast does not include an abrupt cold spell or destructive rain.
USDA hardiness zones describe broad regional patterns, but a zone does not provide the exact last-frost date, current soil temperature, drainage conditions, elevation, or short-term forecast for a particular garden. Combine local frost history, current weather, soil warmth, and the packet instructions.
Transplant indoor seedlings only after frost danger has passed and the weather is reliably warm. One detailed marigold protocol recommends waiting for nighttime temperatures of at least 50–59°F (10–15°C). It also reports that direct-sown plants may need another six to eight weeks after germination to flower, which can noticeably shorten the display in a cool climate. The Maker Makes provides the transplant-temperature and flowering-delay guidance.
Cultivar choice also affects timing. Larger African marigolds generally mature more slowly than compact French or Signet cultivars, so they are worth sowing toward the early side of an appropriate indoor window. When the packet provides a cultivar-specific schedule, follow it.
The practical tradeoff is straightforward:
- Earlier indoor sowing generally produces earlier flowers but creates a longer period of transplant care.
- Later indoor sowing produces younger, easier-to-manage plants but may postpone flowering.
- Direct sowing requires the least indoor work but leaves the entire seedling stage to outdoor conditions.
How to sow marigold seeds indoors, step by step
Gather these supplies before opening the packet:
- A cell tray or small pots with drainage holes
- A watertight tray or saucer for runoff
- Light, well-draining seed-starting mix
- Plant labels and a waterproof marker
- A mister or other gentle watering tool
- A strong light source for use after emergence
- An optional clear humidity cover
Avoid heavy garden soil in small indoor cells.
1. Pre-moisten the mix
Add water gradually and mix it through the medium. It should be evenly damp without dripping. If a squeezed handful releases a stream of water, the mix is too wet.
Pre-moistening is easier than trying to saturate dry mix after planting. Forceful watering after sowing can expose or move shallow seeds.
2. Fill the containers loosely
Fill each cell or pot and settle the mix with a light tap. Do not compress it into a hard block. Leave a little room at the top so water does not immediately overflow.
3. Sow one or two seeds per cell
Place one or two seeds on the surface of each cell. If both germinate, retain the stronger seedling or separate them carefully once they are large enough to handle.
The seeds may lie flat. There is no need to identify a top or place one end downward.
4. Cover the seeds lightly
Published directions range from surface sowing to complete coverage at approximately 1/4 inch. A practical approach is to press each seed into good contact with the mix and add a shallow covering no deeper than about 1/4 inch. Avoid deep burial.
If the packet gives precise depth instructions for the cultivar, follow those instead.
5. Water gently and label the tray
Mist the surface or use a very gentle stream. Apply enough water to settle the covering without excavating the seed. Label the container with the cultivar and sowing date.
6. Add a humidity cover only if useful
A clear cover can reduce moisture loss in a warm, dry room, but it is optional. Inspect a covered tray regularly because the lid can conceal an overly wet mix.
Remove the cover promptly when seedlings begin emerging. The young plants then need improved airflow and unobstructed access to light.
7. Keep the seed zone warm
A practical germination range is approximately 64–75°F (18–24°C), with 70–75°F commonly recommended for prompt emergence. This marigold seed-starting guide reports the 64–75°F range and recommends 70–75°F as an ideal target.
Seedling stretching is addressed primarily by providing stronger, properly positioned light after emergence.
8. Provide strong light immediately after emergence
As soon as green shoots appear, remove any cover and place the tray under its intended light source.
For broader information about equipment, frost-date calculations, moisture management, and the transition outdoors, consult the Garden Seed Source guide to starting seeds indoors. Its advice is general; use the marigold packet for cultivar-specific directions.
How to direct-sow marigolds in a garden bed or container
Direct sowing removes the need for indoor trays and lights. Its main limitation is timing: planting must wait for warm, frost-free conditions, so flowering generally begins later.
Choose and prepare the site
Select a location with at least six hours of direct sunlight each day and soil that drains freely.
Remove weeds and loosen the surface. Break up crusts and large clods so seedlings do not have to emerge through compacted ground. A fine surface also makes shallow, even covering easier.
Wait until frost danger has passed and soil has reached approximately 60–65°F (16–18°C). Postpone sowing if a severe cold spell is likely.
Sow shallowly
Place the seeds in a shallow furrow, individual depressions, or an evenly scattered row. Cover them lightly, no deeper than approximately 1/4 inch unless the packet directs otherwise.
Do not confuse sowing distance with final spacing. Seeds may initially be placed close together, but all the resulting plants cannot remain at that distance. Crowded seedlings must later be thinned according to the cultivar’s mature width.
If seed is limited, place one or two seeds at each intended planting point. If you sow densely, plan to thin promptly.
Water without moving the seeds
Use a watering wand, rose attachment, or gentle spray. A strong stream can wash shallow seeds into piles, expose them, or bury them unevenly.
Keep the surface evenly moist during germination without making it soggy. Check the actual soil rather than watering according to a fixed schedule. Sun, wind, rain, soil texture, and mulch all affect how quickly the seed zone dries.
Direct-sow in containers
Use:
- A container with unobstructed drainage holes
- Free-draining potting mix rather than dense garden soil
- Enough room for the cultivar’s mature roots and canopy
- A position receiving at least six hours of direct sun
A container approximately 10–12 inches wide and deep is one reported practical starting size for many marigold varieties, not a universal minimum. The appropriate plant count still depends on mature size: a large African marigold needs much more room than a dwarf French or Signet cultivar. Thresh Seed’s guide reports the 10-to-12-inch container size and distinguishes it from the wider spacing required by African marigolds.
Containers can dry rapidly in sun and wind, especially while seeds are close to the surface. Check them frequently, but do not leave them standing in water.
Direct-sown seedlings may need temporary protection from severe weather, pets, or other disturbance. A light cover, mesh barrier, or sheltered position can help, provided it permits ventilation and does not press on the seedlings.
Germination care: warmth and moisture first, strong light next
Treat germination as a two-stage process:
- Before emergence: prioritize warmth and consistent moisture around the seed.
- After emergence: provide strong light and improved airflow immediately.
Under warm conditions, marigolds commonly emerge in about five to 10 days, although some seeds may take as long as 14 days. The supported ranges are summarized in this marigold germination guide.
Moisture before emergence
The seed-starting mix or outdoor seed zone should feel evenly damp, never waterlogged. Shallow seeds can fail if they dry completely, while persistent saturation can promote decay and damping off.
Do not apply one watering frequency to every setting:
- Small indoor cells may dry quickly under lights.
- Covered trays may remain wet for several days.
- Garden beds may dry at the surface while staying moist below.
- Containers exposed to wind may need more frequent checks.
- Cool, cloudy weather may sharply reduce water loss.
Inspect the medium before watering. Rehydrate the seed zone without leaving the tray or pot standing in runoff.
Light after emergence
Remove any humidity cover as seedlings emerge and place indoor trays under strong light. Approximately 14–16 hours of daily grow-light exposure is a supported general target. Keep the fixture close enough to discourage stretching while respecting its safe-clearance instructions.
Adjust the light as plants grow. Leaves should not touch a hot or unsuitable fixture, but seedlings should not have to lean toward a distant source.
Warmth and light perform different jobs. Warmth supports germination; sufficient light supports compact seedling growth.
Outdoors, established marigolds flower best in full sun, generally defined as at least six hours of direct sunlight. Newly hardened transplants should reach that exposure gradually rather than moving from indoor conditions to an entire day of intense sun at once.
Sources disagree about whether marigold seeds require light before emergence. Because successful protocols range from surface sowing to full 1/4-inch coverage, do not assume uncovered sowing is universally essential. Shallow placement, good contact with the medium, suitable warmth, and controlled moisture are the more consistent priorities.
From first leaves to transplanting
The leaves that follow are true leaves and begin to show the plant’s characteristic shape.
True-leaf development is a practical signal for thinning.
Thin or separate crowded seedlings
Once seedlings have developed true leaves—often by the second set—inspect each cell or cluster.
If two seedlings share a small cell:
- Keep the stronger one and cut the other at the surface, avoiding disturbance to the retained plant’s roots.
- If both are worth saving, lift the slightly moist root ball and separate the seedlings gently into individual containers.
- Pot a seedling into a larger individual container if its cell is crowded or its roots need more room.
Adjust watering as roots develop
Water thoroughly enough to reach the root zone, then allow the surface to begin drying before watering again. Do not let the entire cell become bone-dry, but avoid keeping the surface continuously glossy or saturated.
Fertilizer is not required for germination. If seedlings remain in containers for an extended period, optional feeding can begin later; one protocol recommends diluted balanced fertilizer after two sets of true leaves. This is supplemental care, not a requirement for sprouting.
Harden seedlings gradually
Indoor-grown seedlings have not experienced outdoor wind, temperature swings, or intense sunlight. Harden them for approximately seven to 10 days, allowing up to two weeks if weather or plant response calls for a slower transition. The Old Farmer’s Almanac recommends hardening indoor-grown marigold seedlings before outdoor planting.
Use this sequence:
- Put the seedlings outside briefly in a sheltered, lightly shaded location.
- Bring them back indoors after the initial exposure.
- Increase their outdoor time gradually.
- Introduce direct morning sun before stronger midday or afternoon sun.
- Add ordinary air movement gradually.
- Bring plants inside or protect them if frost, hail, severe wind, or damaging rain threatens.
Do not put tender seedlings in full sun for an entire day on their first outing. Increase exposure according to how the foliage responds.
Transplant after frost
Move indoor-grown marigolds outside only after frost danger has passed and the weather is reliably warm.
Water the seedlings before transplanting so their root balls hold together. Dig each hole approximately as deep as the cell or pot. Set the seedling at roughly the same depth at which it was growing, firm the soil gently, and water the root zone thoroughly.
During the first several days, check moisture around the original root ball.
Spacing French, Signet, and African marigolds
Keep three different measurements separate:
- Initial seed spacing: the distance between seeds at sowing
- Spacing after thinning: the room given to young seedlings
- Final spacing: the distance needed between mature plants
| Stage or plant type | Practical spacing | Meaning |
|---|---|---|
| Initial sowing in a row or tray | About 1 inch apart or 1–2 seeds per cell | Temporary germination spacing |
| Seedlings after thinning | One plant per cell or selected planting point | Reduces early competition |
| Many compact or medium cultivars | About 8–12 inches apart | Broad final range; packet width takes precedence |
| Larger African marigolds | About 12–18 inches apart | Final spacing for a larger canopy |
French, Signet, and African marigolds are common groups, but they do not share one mature size. French marigolds are commonly compact or medium-sized; Signet marigolds have finer foliage and can suit closer arrangements; African marigolds are generally larger and more upright.
University of Minnesota Extension identifies those three common types and recommends at least 12 inches between African marigolds while allowing French and Signet plants to be set closer. Its type-specific guidance supports using different spacing rather than one universal figure.
Use the packet’s mature width as the final authority. A cultivar expected to spread 10 inches should not automatically receive the same space as one expected to spread 18 inches.
Excessively wide spacing, however, is generally unnecessary for compact cultivars.
A typical sequence is:
- About five to 10 days: emergence under warm, evenly moist conditions
- After true leaves develop: thinning or potting into individual containers
- Before planting outside: gradual hardening of indoor-grown seedlings
- About six to eight weeks after sowing: possible first flowers, depending on cultivar and conditions
The flowering estimate is not a guarantee. Cold weather, weak light, transplant delays, crowding, and cultivar differences can extend it. Dwarf French varieties may bloom sooner than larger plants. Thresh Seed reports flowering at roughly six to eight weeks after sowing, with variation by type and conditions.
Troubleshooting marigold seeds and seedlings
Diagnose the visible symptom before adding more water, heat, or fertilizer.
| Symptom | Likely concerns | Practical response |
|---|---|---|
| No germination | Cold or dry seed zone, excessive depth, old seed, or incomplete germination period | Allow up to 14 days, then check temperature, moisture, depth, seed condition, and decay |
| Dry or erratic germination | Shallow seeds or small cells dried between waterings | Restore even moisture gently without flooding |
| Soft or rotting seeds | Saturated medium, poor drainage, or a tray standing in water | Drain excess water and let the medium return to evenly damp |
| Seedlings collapse at the soil line | Damping off associated with persistent moisture and stagnant conditions | Remove covers, improve airflow, avoid saturation, and use clean mix when resowing |
| Tall, pale, leaning seedlings | Weak, distant, one-sided, or inconsistent light | Move the light closer within safe limits and maintain a consistent daily light period |
| Outdoor seedlings do not appear | Cold soil, frost, washed-away seed, or a dried or crusted surface | Correct the likely condition and resow shallowly when the soil is warm |
| Growth stalls outdoors | Weather or soil remains too cold for active growth | Protect plants from severe conditions and wait for reliably warm weather |
If nothing has emerged
At day 10, continue monitoring. Some marigold seeds may still emerge by day 14. After that point, inspect a few cells or planting spots and ask:
- Was the seed zone warm?
- Did the medium dry completely?
- Was it persistently saturated?
- Were seeds buried much deeper than recommended?
- Are the seeds firm and swollen, or soft and decaying?
- Was the seed old or stored poorly?
Savvy Gardening reports a typical five-to-10-day germination period and identifies excess moisture as a contributor to damping off. Its indoor and direct-sowing guidance provides a useful basis for these checks.
Change the most likely cause rather than altering every condition at once.
If seedlings are leggy
Provide stronger, closer light within the fixture’s safe operating limits. Keep the daily light period consistent and rotate the tray if illumination is uneven.
Do not add a heat mat as a cure. If seedlings are severely weak, resowing under better light may be more effective than maintaining badly elongated plants.
If damping off appears
Remove affected plants, discard badly contaminated mix, and improve conditions for the remaining seedlings.
Remove humidity covers after emergence, avoid persistent surface wetness, and provide gentle airflow. When resowing, use clean containers and fresh, well-draining seed-starting mix.
If you are using old or saved seed
A damp-paper test can help determine whether questionable seed deserves tray or garden space. Place a counted sample on damp paper, enclose it loosely so it stays moist, keep it warm, and observe whether it germinates. Treat this as a troubleshooting test, not a required preparation step.
Saved seed should be collected from mature, dry flower heads and dried thoroughly. Seed produced by hybrids or cross-pollinated plants may germinate without reproducing the parent plant’s exact height, color, or flower form.
Before resowing:
- Confirm that the growing medium drains well.
- Correct a cold seed zone.
- Sow shallowly.
- Restore even moisture without saturation.
- Use fresher seed if viability is doubtful.
- Label the new sowing date.
- Allow the full germination window.
- Change one likely cause at a time.
Frequently asked questions
How deep should marigold seeds be planted?
Sow them shallowly. Press the seeds into contact with the growing medium and add a light covering no deeper than approximately 1/4 inch.
Because published directions range from surface sowing to full 1/4-inch coverage, use the packet to resolve cultivar-specific differences. The main mistake to avoid is deep burial.
Do marigold seeds need light to germinate or should they be covered?
The available instructions conflict. Some recommend surface sowing, while others report successful germination with complete 1/4-inch coverage. Eden Brothers, for example, recommends surface placement because it treats marigold seed as light-requiring, while other supported protocols cover the seeds. See the Eden Brothers planting guide for the surface-sowing position.
A dependable compromise is a very light covering that maintains soil contact and limits rapid drying without burying the seed deeply.
Do marigold seeds need soaking, stratification, or a particular end facing down?
No special pretreatment is generally required. Seeds can be sown dry without soaking or cold stratification, and they may lie flat rather than being placed in a fixed orientation.
How long do marigold seeds take to germinate?
Expect approximately five to 10 days when the seed zone is warm and evenly moist, but allow up to 14 days before treating the sowing as a failure.
If nothing appears after that period, check temperature, moisture, depth, seed age, and signs of decay before resowing.
Can marigold seeds be sown directly in pots?
Yes. Choose a pot with drainage holes, fill it with free-draining potting mix, sow shallowly, and water with a gentle spray. Keep the upper layer evenly damp while the seeds germinate.
Choose the final number of plants according to mature cultivar width, not according to how many seeds sprout. A compact cultivar may share a broad container, while a large African marigold may need substantially more room.
The final checklist is simple: choose indoor starting or direct sowing according to your season and desired bloom date; sow shallowly in a well-draining medium; maintain warmth and even moisture until emergence; provide strong light immediately afterward; thin according to mature cultivar size; and harden indoor seedlings before planting them outside after frost. Whenever timing, depth, or spacing differs, let the seed packet’s cultivar-specific instructions take precedence.